So many layers of paint!
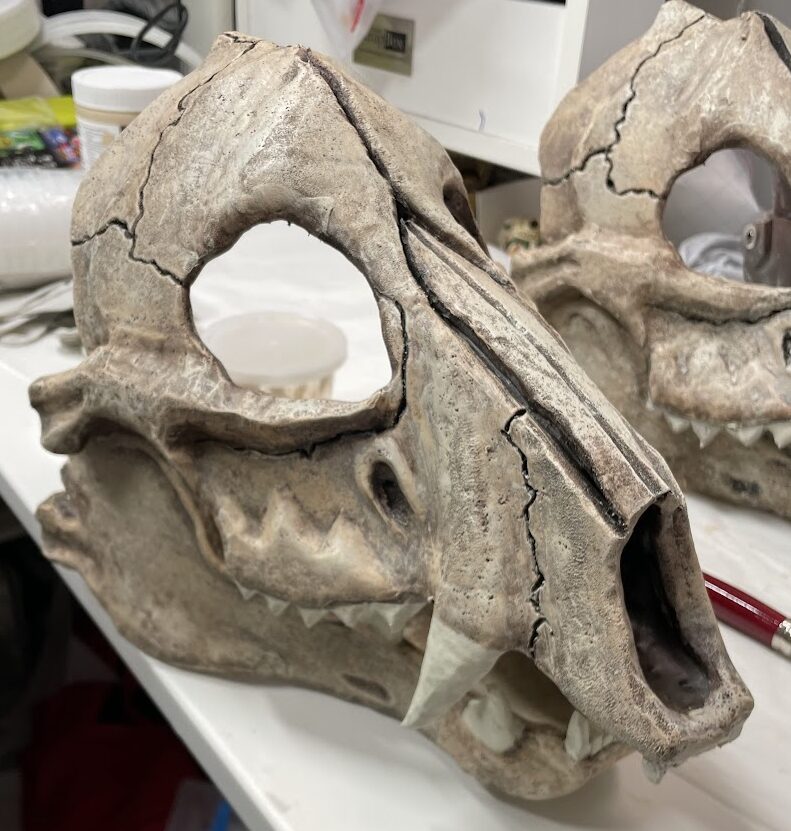
After the first painting with unbleached titanium, next came a wash with a mixture of watered-down burnt sienna, raw sienna, and Mars black. This involves applying a fair amount of the watered paint and then blotting with a damp paper towel.
In the SKS video, this looked sort of snotty green, but for us it was much redder. We eventually decided it was due to the lighting and poor color correction in the video itself, and carried on.
After this layer, we then add more black to the mix and use it to put in lowlights and shadows, using a fine brush to make sure the sutures are properly dark at the bottom, and broader brush (and more dilution) to make shadows in some of the corners and depressions.
Then comes more unbleached titanium, with a hint of the raw sienna added to it. This is another place where the color balance in the video looked much brighter/greener than what we were seeing, but we kept going, as even if the colors were different, everything looked really good.
At this point, the masks look like a bit like old bone that’s been buried in red clay for a long time — and it’s fabulous. It *absolutely* does not look like layers of EVA foam.
The final layer of paint is dry brushing with Liquitex Parchment, which is much less pink and quite opaque.. The teeth were completely painted to make them stand out from the slightly darker “bone” and then highlights as appropriate on different areas of the skulls. Because it’s so opaque, being sparing in it’s application was really important.
The result is a subtle shift, but the parchment damps out a lot of the reds and gives us something that really looks like old bone.
Now that all the painting is done, time to try putting the mandible back on the skull and see how things are shaping up. We are very happy with the results. It is amazing to think this started as flat grey EVA foam!
Still to do is adding the elastic (straps to secure the mask and some to spring-load the mandible hinge) and adding a fur drape off the back of the skulls.


